Introduction:

Other websites

As a best practice, websites generally points to CDNs for downloading of Javascript libraries and CSS.   CDN hosts are geographically scattered  and when a user connects to a website, the libraries are downloaded from nearest CDN which improves overall website performance.

However, we can’t completely rely on CDNs.  They may be down during a maintenance downtime.  In that case we can’t take our website down and impact our users.  Hence we need to implement a fallback mechanism.

FallbackJS:

Fallback JS is open source javascript library using which we can easily implement a fallback mechanism.  Here is the brief description on this library from fallback js website.  

Fallback JS is a tiny library that allows you to load both JavaScript and CSS libraries after your page has already loaded. Our library also allows you to specify “failovers” or “fallbacks” for each of your libraries, that way in case one of those external libraries your site is using happens to go down, you won’t be leaving your users with a dysfunctional website. Just because someone else’s website breaks, it doesn’t mean that yours should!

Install fallback js:

Using npm we can download fallback js.   Here is the command:

> npm install fallback

Or we could directly download fallback.min.js and include in the project.

Add following line to .html page to include fallback js script.


http://scripts/fallback.min.js

Define library sources:

We need to specify the libraries inside the load method.  In the following code snippet, the ‘angular’ and ‘custom’ are the library names.  For each library, we can specify multiple source paths.  The order of the source matters here.  In this example I am loading angular.min.js from opensource.keycdn.  The next source is the local library on the website.  So, first it tries to load angular from keycdn.  It it can’t for some reason, then it goes to the second option which is local source.

The names of the library can be anything except if you want to use the shimming.  Shimming is the process of specifying the dependencies/ order of the libraries.  

Note: If you want to specify shim, then you should name the libraries according to the library what you are trying to load. For instance, if it is a angularJS then it angular.  If it is a kendo library then it should be ‘kendo’.  If it is JQuery UI library then JQuery.UI. Otherwise shimming doesn’t work.  For CSS libraries, there are not restrictions.

In this example, I have to load angular first before loading my home.js javascript file.  Hence the dependency is specified in the shim as ‘custom’: [‘angular’].  Observe that its an array.  So you can specify any number of library names as dependencies.


 fallback.load({
      'angular': [
                 'https://opensource.keycdn.com/angularjs/1.6.2/angular1.min.js',
                 'scripts/angular.min.js'
                 ],
      'custom': ['scripts/home.js']
      },
      {
      shim: {
         'custom':['angular']
      }
    });

    fallback.ready(function() {
    angular.element(document).ready(function () {
    angular.bootstrap(document, ['newangularapp1']);
    });
  });

AngularJS manual bootstrap:

As we are loading libraries using fallback we can’t use angular’s default behavior.  Rather we have to bootstrap angular manually once the libraries are loaded.  Fallback provides a method called ready which takes a function definition.   We can define anything here which we want to run after the libraries are loaded.  

In our code, I have added code to call angular bootstrap inside ready method.

<div class="row">
<div>{{message}}</div>
</div>

Limitations:

There are limitations with fallback js.  It doesn’t seem to be working correctly with IE browser.  I didn’t have any issues with Chrome.

Conclusion:

For performance reasons websites point to CDN for any javascript and CSS libraries.  However, we need have backup or fallback support if CDN is down.  Using Fallback JS we can achieve it.  It provides flexibility to define multiple source and define dependencies.   As libraries load process can’t be determined, hence we need to manually bootstrap angular.
Other websites

Enable Trace for a WCF service

Posted: January 20, 2017 in WCF

Introduction:

Capturing Logs in an application (server /client side) helps in analyzing and identifying any issues.  Especially it is very helpful when an issue occurs only on Test/Production environments which can’t be duplicated on local developer machines.  

Sometimes, there could be issues at low/framework level.  In those scenarios,  application level logging is also not much helpful as exception might happen even before hitting the initial break point in the application/developer code.  The same is true for a WCF service as well.

In such cases, we could enable WCF service tracing which logs all the steps in WCF request/response pipeline.

Creating a WCF test service and deployment:
Create a simple WCF service and host it on IIS.  Refer this article for more details.

Update web config:

Now we make few changes to web.config. Open the web.config of WCF project and make following changes:

1) Add following diagnostics section in the config file.  Here we are adding listeners and also telling the location to write the log file.  Update the log file path (initializeData) according to folder structure in your machine.

<system.diagnostics>
    <trace autoflush="true" />
    <sources>
        <source name="System.ServiceModel" switchValue="Information, ActivityTracing">
        				<listeners>
          <add name="xml"/>
        </listeners>
      </source>
      <source name="System.ServiceModel.MessageLogging">
        				<listeners>
          <add name="xml"/>
        </listeners>
      </source>
    </sources>
    <sharedListeners>
      <add name="xml" type="System.Diagnostics.XmlWriterTraceListener" initializeData= "C:\logs\WCFDiagnosticsExample.svclog" />
    </sharedListeners>
</system.diagnostics>

2) Add following configuration inside serviceModel section.

 <system.serviceModel>
     <diagnostics>
      <messageLogging logEntireMessage="true" logMalformedMessages="true" logMessagesAtServiceLevel="true" logMessagesAtTransportLevel="true" maxMessagesToLog="3000" />
     </diagnostics>

Call the WCF service:

Open WCFTestCient and add test service (defined above).  Make a service call using Invoke button.

Once you invoke a method on WCF test service, you should be seeing a log file generated at specified location.   If you observe the size of the file, it may be zero.  That means the log entries are not yet flushed out.  Stop the web application on IIS manager.  Then the log contents will be written to the file.

Service Trace Viewer:

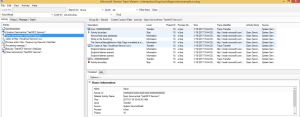
There is a tool called Service Trace Viewer from Microsoft to view the contents of the log file (*.svclog).  To open the tool, open windows explorer and go to following location.   The version folder names may vary depending on what version is installed in your machine.

C:\Program Files (x86)\Microsoft SDKs\Windows\v10.0A\bin\NETFX 4.6 Tools
Note: If you don’t see SDK folder, then you need to install Microsoft Windows SDK.

servicetrace

Note: If your wcf service is not hosted by IIS and you have a self host application, then you need to run the app in admin mode to grant permissions to the logging path.

Recently we came across an issue where users complained about not receiving emails from our website. We have our own SMTP server setup for that website/application.
After verifying application logs as well as Pickup/Drop/Queue/BadMail SMTP folders on the server, everything looked fine. So, now the question is how to verify if the service is really sending emails or not. We might not be able to force the application to send a test email. In this scenario, we could test email functionality from command prompt using telnet. In this article, I put together the steps to send email using telnet.

To start with, we need to enable Telnet client on the machine from where we want to connect to SMTP service.

Steps to enable Telnet client:
Open Run window and type “appwiz.cpl”
It opens “Programs and Features” window.
Click on “Turn Windows features on or off” link from left pane.
“Windows Features” window will be opened.
Scroll down until you find “Telnet Client” option. Check the checkbox and say OK.
If it prompts for System restart, you can select “do not restart now” option because enabling Telnet Client option doesn’t require system reboot.

Testing email functionality:
Open command prompt.
Run the following commands to open telnet connection.

telnet
open <servername/IP> 25

25 is the default port number where SMTP service listens. Make sure your SMTP service is configured with default port number. If not use appropriate port number.
In the above command, we are opening telnet first and then opening a session with Server.
Instead we could use the following single command:

telnet <servername/IP> 25

If it is not able to establish a connection, then an error message would be displayed as “Could not open connection to the host…”. Then you need to check for connection error/firewall settings etc.

Assuming we successfully established the connection, the next step is to say hello to the server using following command. You would get a hello response from service.

HELO

Now, start creating an email. First enter from address using following command.
Note that there is a space between colon (:) and email address. After multiple attempts, I realized that space is mandatory.  Without a colon, it throws some random error and the error message doesn’t help much.

mail from: kirandhappuri@gmail.com

Enter the recipient’s address using following command. Here space is not required after colon (I didn’t know why?)

rcpt to:kdhappuri@gmail.com

Next step is to enter email text. To do this, type following command and press enter.

Data

Then enter email Subject. Press “Enter” twice. Then enter email body/content. Then press “Enter” twice. In the end enter a period (.) and press “Enter”.

Subject:(email subject…)
(Enter)
(Enter)
(email content goes here… )
(Enter)
(Enter)
.
(Enter)

Once you press Enter, you would see a confirmation message saying the message was sent successfully. You can check your email and verify email headers. The headers should show the SMTP server name from where the message was sent.

While testing this functionality, I observed that sometimes it throws random errors though you enter correct commands.  I realized that if we re-execute the same command next time, it would be successful.


Please provide your feedback/comments/suggestions that will help me improve my blogging.

In this article, we are going to discuss on Web browser automation and how to leverage test cases so that a single test case can run on different type of browsers.
Here, we are focusing on Web Driver approach, where we instantiate specific browser driver and run the tests locally. There are other options like Selenium RC and Selenium Grid where the test cases can be run on a remote server and also has options like parallel processing etc.

Selenium IDE:
Selenium IDE is an extension for FireFox which can be used for recording test steps and generate test scripts. It provides different export options including NUnit test cases for .Net.
Install Selenium IDE extension for FireFox from http://www.seleniumhq.org/ and follow the instructions.

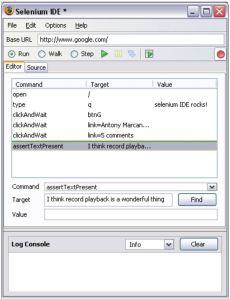
Open Selenium IDE from FireFox browser. The typical screen looks like below.

SeleniumIDE

Now click on the Red button to capture steps. Perform test steps on the web page. You could observe that each action would be captured on IDE. Now you may want to add an assertion for verifying results. For instance, we may want to verify text on particular label. Select assertText Command from Command dropdown and click on Select. Now you could select a field on the web page and when you click on a field on the page, it would be selected as Target on Selenium IDE. Enter the value as “Results” in value field on IDE. Now we are asserting against the value “Results”. If it matches, then test would succeed otherwise it would fail. For more details on capturing test steps on Selenium IDE, you may search on google or youtube for help videos.

Exporting Test Cases:
We have captured test steps using Selenium IDE and now we would export the test cases in C# .Net syntax. Selenium supports multiple formats for Exporting. However, we want to export as C# NUnit test cases in this example.
Go to File -> Export Test Case As and select C# /NUnit /Webdriver. Save file as Results.cs to local drive.

Options:
Selenium IDE provides few configuration settings which are important for generating test code. For instance, XPath selector doesn’t work on Internet Explorer or Edge browsers. So, we could tell IDE to include only specific Selectors. To do this, go to Options -> Locator Builders. Locator Builder window will be opened.  We can reorder the locator list based on our requirement.  In this example, I have moved xpath:position selector to end of the list, so that it would be the last option for IDE to use while generating test cases.

Single Test class for different browsers:
Now we have exported the test case to C# code and generated a N-Unit test case. Visual Studio has an extension called NUnit Test Adapter for N-Unit test cases. Once we install it we could run NUnit tests inside Visual Studio Test Explorer along with VS test cases.

The next step is to install web drivers for different browsers. The following nuget packages are available for this.
Selenium.WebDriver
Selenium.WebDriver.ChromeDriver
Selenium.WebDriver.IEDriver
Selenium.WebDriver.MicrosoftWebDriver
Selenium.Support

Define the Test class as generic of type IWebDriver. TestFixture attribute takes driver type as a parameter. In the test class constructor, instantiate the generic type. Depending on current type, the appropriate driver will be instantiated. We can specify different TextFixutre attributes depending on what all browsers we want to test. See the code snippet below.


[TestFixture(typeof(FirefoxDriver))]
[TestFixture(typeof(ChromeDriver))]
[TestFixture(typeof(InternetExplorerDriver))]
[TestFixture(typeof(EdgeDriver))]
public class LoginTest<TDriver> where TDriver : IWebDriver, new()
{
        private ISelenium driver;
        private StringBuilder verificationErrors;

        [SetUp]
        public void SetupTest()
        {
            driver = new TDriver();
            baseURL = "http://localhost:33517/";
            verificationErrors = new StringBuilder();
        }

        [TearDown]
        public void TeardownTest()
        {
            try
            {
                selenium.Stop();
            }
            catch (Exception)
            {
                // Ignore errors if unable to close the browser
            }
            Assert.AreEqual("", verificationErrors.ToString());
        }

        [Test]
        public void LoginTest()
        {
            driver.FindElement(By.Id("EmailID")).Clear();
            driver.FindElement(By.Id("EmailID")).SendKeys(username);
            driver.FindElement(By.Id("Password")).Clear();
            driver.FindElement(By.Id("Password")).SendKeys(password);
            driver.FindElement(By.CssSelector("#login-form form")).Submit();

            //Assert here for success
        }
}

Once we apply TextFixtures for number of different browser drivers, we could see those many number of Tests in Visual Studio Test Explorer. In above case, there will be 4 tests with the name LoginTest. On mouse hover, each test case can be seen with different browser name.
NUnit provides setup and cleanup methods, which are applied with SetUp and TearDown attributes. These will be executed for each and every test.

Issues observed with different browsers:

  • Xpath selectors aren’t supported by IE and Edge drivers. Replace them with CSS selectors.
  • For Internet Explorer, if element.Click() desn’t work then we can use element.SendKeys(Keys.Enter) as an alternate.
  • Implement wait on Find element scenarios to address the issue of finding elements before they are loaded. See code below:

public void Login()
{
     var wait = new WebDriverWait(driver, TimeSpan.FromSeconds(10));
     wait.Until(ExpectedConditions.ElementIsVisible(By.Id("EmailOrAssociateID"))).Click();
}

  • Use Thread.Sleep() for scenarios where click event doesn’t actually trigger the action.
  • For Edge browser, you may have to run click command twice in some scenarios.

AngularJS provides powerful data binding features. In many scenarios, we would need to change DOM elements’ status depending on user actions or data updates in controllers/ the back end.

Few simple examples:

  • The “continue” button is enabled only if user clicks on “agree to terms and conditions” check-box.
  • Show a particular message on the View, if the ‘flag’ value is true which is received from an external server/database.

There are many other different scenarios, where we would need data-binding.

Bindings are of two types:

  • One-way ($scope → View)
  • Two-way ($scope → View and View → $scope)

By default, the bindings are one-way. For example if we use ‘ng-bind’ then it is one-way, whereas ‘ng-model’ is a two-way binding.

Here, we will take a very simple example; However it covers most of the scenarios. And in the end, I would add couple of points to debug issues with data binding. In our example, we add a toggle button, a Text Box and a text area. At any point of time, either Text box or Text area is visible. When user starts typing in text box and then if he clicks on toggle button, Text box will be hidden and Text area will be visible with already typed text, so that user can continue typing. Here is the code for our view. Defined a button, an input and textarea. To control the Text Box and Text Area’s visibility, we are using ‘ng-show’. If ng-show value is evaluated as true then control will be visible, otherwise it will be collapsed. Input and textarea are bounded with myText property.

<div ng-app="myTestApp">
    <div ng-controller="nameController">
        <button ng-click="onBttnClick()">Toggle</button>
        <br/>
        <br/>
        <br/>
        <input ng-show="isVisible"  ng-model="myText"> </input>
        <textarea ng-show="!isVisible" ng-model= "myText"></textarea>
    </div>
</div>

Below is the code for AngularJs controller. myTestApp is added as a new module. Defined a controller with name ‘nameController’. Inside the controller, we have defined two variables isVisible and myText. onBttnClick method works as toggle function. The method has simple logic for inverting the flag value.

var myTestApp= angular.module(myTestApp, []);

myTestApp.controller('nameController', ['$scope',  function nameController($scope){
    $scope.isVisible = true;
    $scope.myText = "";

    $scope.onBttnClick = function onBttnClick(){
        $scope.isVisible = !$scope.isVisible;
    }
}]);

Few points to note for resolving binding issues:

Sometimes, though the variables are updated in the controller, the changes won’t be reflected on View. There could be multiple reasons for that.
It could be an issue with nested directives (parent child) hierarchy in the DOM structure. In this case angularjs creates parent/child scopes.

<div ng-if=”isVisible==’true’”>
		<input ng-model=”myText” />
</div>

To resolve this issue, observe the value of $scope.$parent variable and look at $watchers. Then appropriate $scope can be used in the view.

Other alternate for this is to use $rootScope which is global.
$rootScope.isVisible = true;

In the View, use ng-show=”$root.IsVisible”.

Other reasons could be,- single controller may be used in multiple places on the view. Hence different controller instances are created.

Introduction: The most common scenario in any application development (desktop/web/mobile) is to build Authentication/Authorization. In Role based authorization, we define set of roles and each role is authorized to do some actions.  It tightly couples application security with business logic.  Number of roles would be needed if there are complex rules depending on business need. The alternative is Claims based Authorization.  In this method we define claims as Resource and Operation pairs.   Each user is assigned different claims and based on claims, we authorize user actions. Creation of Claims: When a new user is created, set of claims would be added to the user. WIF comes with a table called AspNetUserClaims for storing claims. UserId column is a foreign key to Id column in AspNetUsers table. In a typical application, claims can be created in following ways:

  • Populated using back end jobs based on details from Organization’s internal database/sources
  • Inserted inside application during/after user Registration/Signup process.

The creation of claims is a one time job and may be updated based on changes in business rules. Claim Example:

ClaimType: "http://abc.com/identity/claims/Account"

ClaimValue: "Update"

Loading Claims: Now, we have the claims saved in database for each user.   When a user logs into the system, we have to read/load those claims and associate them with User Identity.  We would perform this by implementing a custom http module and subscribe to PostAuthenticationRequest event in Init method.

public class CustomClaimsBasedAuthorization : IHttpModule, IDisposable
{
	public void Init(HttpApplication context)
	{
		context.PostAuthenticateRequest += PostAuthenticateRequestEvent;
	}

	void PostAuthenticateRequestEvent(object sender, EventArgs e)
	{
		var sessionAuthModule = FederatedAuthentication.SessionAuthenticationModule;
		if (sessionAuthModule.ContainsSessionTokenCookie(HttpContext.Current.Request.Cookies) &&
		sessionAuthModule.ContextSessionSecurityToken != null)
		{
			var ck = sessionAuthModule.ContextSessionSecurityToken;
			sessionAuthModule.AuthenticateSessionSecurityToken(ck, false);
		}
		else
		if (HttpContext.Current != null && HttpContext.Current.User != null && HttpContext.Current.User.Identity.IsAuthenticated)
		{
			ClaimsPrincipal cp = CreateClaimsedBasedPrincipal();

			var sstoken = new SessionSecurityToken(cp);
			sessionAuthModule.WriteSessionTokenToCookie(sstoken);
		}
	}

        private static ClaimsPrincipal CreateClaimsedBasedPrincipal()
	{
		string userName = Thread.CurrentPrincipal.Identity.Name;
                //Load claims from Database/Service
		var claims = LoadClaims(userName);

		var cp = new RmsClaimsPrincipal(userName, claims);

		Thread.CurrentPrincipal = cp;
		if (HttpContext.Current != null)
		{
			HttpContext.Current.User = cp;
		}
		return cp;
	}
}

internal sealed class CustomClaimsPrincipal : ClaimsPrincipal
{
	public CustomClaimsPrincipal (string userName, IEnumerable<RmsUserClaim> userRoles)
	{
		var gIdentity = new GenericIdentity(userName, "RMS custom authentication");
		var cIdentity = new ClaimsIdentity(gIdentity);

		foreach (var claim in userRoles)
		{
			cIdentity.AddClaim(new Claim(claim.ClaimType, claim.ClaimValue));
		}
		AddIdentity(cIdentity);
	}
}

In the above example, we create ClaimsPrincipal and add claims to the Identity. However, the ClaimsPrincipal creation process will be executed for each and every request to the web application which could be potential performance issue.  To improve the performance, .Net Framework 4.5 supports writing ClaimsPrincipal with all of its claims to a Cookie.  To enable this, following web.config changes are required. Add following config section:

<configSections>
  <section name="system.identityModel.services"
   type="System.IdentityModel.Services.Configuration.
                SystemIdentityModelServicesSection,
 System.IdentityModel.Services, Version=4.0.0.0,
 Culture=neutral, PublicKeyToken=B77A5C561934E089" />

Add following Config elements to support creation of Cookie

<system.identityModel.services>
  <federationConfiguration>
    <cookieHandler requireSsl="false" />
  </federationConfiguration>
</system.identityModel.services>

Configure module that handles reading and writing the cookie.

<modules>
  <add name="SessionAuth"
       type="System.IdentityModel.Services.SessionAuthenticationModule,
             System.IdentityModel.Services, Version=4.0.0.0,
             Culture=neutral, PublicKeyToken=b77a5c561934e089"/>

Restricting actions based on claims: We have claims in place and we would want to restrict controller actions based on claims. For this, we could apply PricipalPermissionAttribute or ClaimsPrincipalPermissionAttribute. For example:

[ClaimsPrincipalPermission(SecurityAction.Demand, Resource = "Account", Operation = "Update")]
public void UpdateDetails()
{
//Update logic
}

These attributes serve the purpose, as we could specify required resource and type of action. However, these attributes are invoked by CLR. If the role check fails it throws a Securityexception. Instead we want to show login page so that user could login to appropriate role. Alternately, we could use Authorize attribute. However it doesn’t support Resource/Action out of box. So, we want to write our own custom attribute by extending AuthorizeAttirbute.

internal class CustomAuthorizeAttribute : AuthorizeAttribute
{
	public string Resource { get; set; }

	public string Operation { get; set; }

	protected override bool AuthorizeCore(HttpContextBase httpContext)
	{
		var cPrincipal = (ClaimsPrincipal)httpContext.User;
		var resourceClaim = string.Format("{0}/{1}", "http://abc.com/identity/claims", Resource);
		return cPrincipal != null && cPrincipal.HasClaim(resourceClaim, Operation);
	}
}

Once we define custom attribute, it could be used as below:

[CustomAuthorize(Resource = "Account", Operation = "Update")]
public void UpdateDetails()
{
//Update logic
}

Please provide your valuable feedback/comments/suggestions that would help me improve my writing.

Introduction:

In this article I would like to discuss about displaying a modal dialog or popup using Kendo UI Window.  There are tons of articles on net on similar topic, however here I would like to do it using ASP.Net MVC so we use MVC partial view to render contents on Kendo Window.  We also use Kendo Grid to populate the data dynamically.   We would also cover how to refresh the Grid data using AJAX calls and how to pass a MVC model from Java script/client to MVC server controller action.

Here are the things we would like to do for the demo purposes:

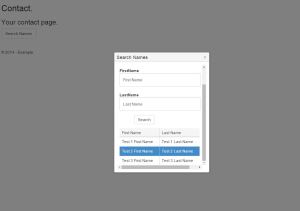
Displaying a search button on a view.  Upon clicking on search button, a modal dialog will be displayed with two input fields for First and Last Names.  When user clicks on Search button after entering the data in the text boxes, we would display matching records in a grid on the same window.

Capture3

Install Kendo UI

First step to install Kendo UI.  Follow the steps as mentioned in below article:

http://docs.telerik.com/kendo-ui/aspnet-mvc/asp-net-mvc-5

Note: The above instructions talk about installing Kendo UI separately and then integrating it with our application.  If you had installed Kendo UI code using Nuget package and then used Telerik upgrade wizard visual studio extension to upgrade to professional version then you may have to do couple of changes in BundleConfig.cs to work Kendo UI properly.

bundles.Add(new ScriptBundle("~/bundles/kendo").Include(
			"~/Scripts/kendo/2014.3.1119/kendo.all.min.js",
				// "~/Scripts/kendo/kendo.timezones.min.js", // uncomment if using the Scheduler
			"~/Scripts/kendo/2014.3.1119/kendo.aspnetmvc.min.js"));

bundles.Add(new StyleBundle("~/Content/kendo/2014.3.1119/css").Include(
			"~/Content/kendo/2014.3.1119/kendo.common-bootstrap.min.css",
			"~/Content/kendo/2014.3.1119/kendo.bootstrap.min.css"));

Observe that there is a version number folder2014.3.11 in the path.  This is basically the kendo UI version you had installed.  Make sure to add correct version number and path.

Kendo Window

We use Kendo HtmlHelper extension for creating the modal window.  The kendo window is assigned with a name “window” and with a caption “Search Names”.   We use LoadContentFrom method to load the contents by calling MVC controller action.  The first parameter is action name and the second one is controller name.  We also set Modal as true so that the dialog would be a modal dialog.  HtmlAttributes method is used for styling purposes.   An OnClose event handler is attached to the window.   Here is the code snippet:

<div id="UserForm">
    <span id="SearchButton" class="k-button">Search Names</span></div>
<div>
    @(Html.Kendo().Window()
          .Name("window")
          .Title("Search Names")
          .LoadContentFrom("Search", "Home")
          .Draggable()
          .Actions(actions =&gt; actions.Close())
          .Modal(true).Visible(false)
          .HtmlAttributes(new { style = "margin: 10px" })
          .Events(ev =&gt; ev.Close("onClose"))
          )</div>

We also need to add a reference to Kendo MVC UI.

@using Kendo.Mvc.UI

In java script, subscribe to search button click event handler.   Inside click method open kendo window and place it in the center.   We have also added kendoValidation so that we can validate model state before opening modal window.


    $(document).ready(function () {
        var validator = $("#UserForm").kendoValidator().data("kendoValidator");

        $("#SearchButton").bind("click", function () {

            if (validator.validate()) {
                $("#window").data("kendoWindow").open().center(true);
            }
        });
    });


In the Controller, add an action for Search functionality.  Define a class called UserDetails with First Name and Last Name fields.  Add a partial view with UserDetails model and select “Create Scaffold template” option to display First Name and Last Name fields.

[HttpGet]
public ActionResult Search()
{
	return PartialView();
}

public class UserDetails
{
	public string FirstName { get; set; }

	public string LastName { get; set; }
}

The Serach partial view code looks like below:

@using ExchangeAdda.Models
@model ExchangeAdda.Models.UserDetails

@using (Html.BeginForm())
{
    @Html.AntiForgeryToken()
<div class="form-horizontal">
<h4>UserDetails</h4>

<hr />

@Html.ValidationSummary(true, "", new { @class = "text-danger" })
<div class="form-group">
            @Html.LabelFor(model =&gt; model.FirstName, htmlAttributes: new { @class = "control-label col-md-2" })
<div class="col-md-10">
                @Html.EditorFor(model =&gt; model.FirstName, new { htmlAttributes = new { @class = "form-control" } })
                @Html.ValidationMessageFor(model =&gt; model.FirstName, "", new { @class = "text-danger" })</div>
</div>
<div class="form-group">
            @Html.LabelFor(model =&gt; model.LastName, htmlAttributes: new { @class = "control-label col-md-2" })
<div class="col-md-10">
                @Html.EditorFor(model =&gt; model.LastName, new { htmlAttributes = new { @class = "form-control" } })
                @Html.ValidationMessageFor(model =&gt; model.LastName, "", new { @class = "text-danger" })</div>
</div>
<div class="form-group">
<div class="col-md-offset-2 col-md-10">
                </div>
</div>
</div>
}

Kendo Grid

Now we need add a kendo grid to the Search view which displays the search results.  Bind the Grid to UserDetails model and add columns for First and Last names.

<div>
<div>
        @(Html.Kendo().Grid()
              .Name("AssociateSearch")
              .HtmlAttributes(new { style = "max-height: 50px; border:0px" })
              .Columns(columns =&gt;
              {
                  columns.Bound(x =&gt; x.FirstName);
                  columns.Bound(x =&gt; x.LastName);
              })
              .Selectable()
              .Resizable(resizing =&gt; resizing.Columns(true))
              .DataSource(dataSource =&gt; dataSource
                  .Ajax())
        )</div>
</div>

Now, add a click event in java script to make an AJAX request to load the data.  Here, we are creating client side model which is equal to server side UserDetails model.  The properties are populated using document getElementById method.  Specify the action name as Url.  Make sure to add content type as application/json.  The data parameter is assigned with earlier created model.  Add an event handler for success and refresh grid data upon success.


    $('#FindBtn').click(function (e) {
        e.preventDefault();
        var UserDetails =
        {
            "FirstName": document.getElementById('FirstName').value,
            "LastName": document.getElementById('LastName').value,
        };
        $.ajax({
            url: "SearchJsonRequest",
            type: 'POST',
            contentType: "application/json;charset=utf-8",
            data: JSON.stringify(UserDetails),
            dataType: "json",
            success: function (data) {
                var grid = $('#AssociateSearch').getKendoGrid();
                grid.dataSource.data(data);
                grid.refresh();
            }
        });
        return false;
    });


The final step is to add an action in the controller for search functionality. I have added some dummy data to create a collection and return to the client for demo purpose. In reality there might be another service/BLL/DB call to fetch data based on search criteria.  The important thing to note is the method should return JsonResult.  The method accepts the UserDetails model data which is a better way for passing data from client to server.

[HttpPost]
public JsonResult SearchJsonRequest(UserDetails details)
{
	//Implement your search logic here

	var list = new List()
	{
		new UserDetails{ FirstName = "Test 1 First Name", LastName = "Test 1 Last Name" },
		new UserDetails{ FirstName = "Test 2 First Name", LastName = "Test 2 Last Name" },
		new UserDetails{ FirstName = "Test 3 First Name", LastName = "Test 3 Last Name" },
	};

	return Json(list);
}

Other Websites

Namespace Mapping using XmlnsDefinition

In a typical WPF application/project we do have multiple projects/folders hence multiple namespaces.  Now when we want to use the classes from different namespaces in a XAML file, we would need to reference each namespace.

For instance, let’s say we have two projects called ABC.Presentation, ABC.WPF.  And say, we have following folders in the project hence following namespaces:

ABC.Presentation.Controls

ABC.Presentation.Behaviors

ABC.Presentation.Converters

ABC.Presentation.AttachedProperties

Now we would like to use some of the classes from these namespaces in our another project ABC.WPF.   To do that we would need to add following references inside XAML file. Of course a project reference to ABC.Presentation should be added to ABC.WPF project.


xmlns:t="clr-namespace:ABC.Presentation.Controls;assembly=ABC.Presentation"

xmlns:t="clr-namespace:ABC.Presentation.Behaviors;assembly=ABC.Presentation"

xmlns:t="clr-namespace:ABC.Presentation.Converters;assembly=ABC.Presentation"

xmlns:t="clr-namespace:ABC.Presentation.AttachedProperties;assembly=ABC.Presentation"

This makes your XAML file with bunch of references and the same thing has to be done with each XAML page in your application.   Another disadvantage with this is more maintainability.  If you change the namespace of any of existing one for any reason, now you need go to each XAML file and update there.

So it would be a better idea if we could have all of these references in a single place and Yes, it can be done.    Here are the steps:

Go to ABC.Presentation project and open AssemblyInfo.cs file.  Add XmlnsDefinition for each name space.  The first parameter is XAML namespace identifier.  This can be anything but it should be unique in your application.  Typically it is structured as Orgnization name/schema/customname.   The second parameter is CLR namespace name.  The advantage here is, we could use the same XAML namespace name for multiple CLR namespaces.


[assembly: XmlnsDefinition("http://www.abc.com/schema/presentation", "ABC.Presentation.Controls")]

[assembly: XmlnsDefinition("http://www.abc.com/schema/presentation", "ABC.Presentation.Behaviors")]

[assembly: XmlnsDefinition("http://www.abc.com/schema/presentation", "ABC.Presentation.Converters")]

[assembly: XmlnsDefinition("http://www.abc.com/schema/presentation", "ABC.Presentation.AttachedProperties")]

Now how do we make use of this identifier.   Inside the XAML file we could simply declare in a single line as shown below:


xmlns:pre="http://www.abc.com/schema/presentation"

Then using ‘pre’ we could access all the classes from different namespaces.

 
XmlnsDefinition doesn’t work: The tag/name does not exist in XML namespace

After following the steps as described above, I tried building my solution and I get the error saying the class name does not exist in namespace http: //www.ABC.com/schema/presentation.

After analyzing more I found the solution to fix the issue.  It looks like a Visual Studio bug.  After defining XAML namespace Identifier in AssemblyInfo file I built the project (ABC.Presentation) and then went to main project (ABC.Presentation where I am trying to refer the class names in XAML file), removed the project reference to ABC.Presentation.  And then re-added the reference.   That fixed the issue.


Note:
XmlnsDefinition works with foreign assemblies only.  That said, if you try to define a XAML namespace identifier for different namespaces and try to use it in the same assembly, it wouldn’t work.

In this article I would like to discuss on hosting a WCF service in IIS.

Create a WCF service application:

As a first step, create a  WCF service application.   From Visual Studio, go to File -> New -> Project.  Select ‘WCF Service Application’ under WCF in templates window.

The following components will be present in the newly created project:

  •         App_Data folder
  •         IService1.cs interface
  •         Service1.sbc and Service1.svc.cs files.  You can rename the interface and service files.
  •         Web.config file.

The Service1 class is defined with following two service methods and I don’t make any changes rather I would use it as it is.

  •         GetData
  •         GetDataUsingDataContract

Now we need to add end points for the service.  Go to web.config file and add following configuration under System.ServiceModel section.  Replace Contract and Service names according to your service namespace and class names.

<pre><system.serviceModel>
	<services>
  	<service name="MyTestService.Service1" >
    	<endpoint address="" binding="basicHttpBinding" contract="MyTestService.IService1">
    	</endpoint>
    	<endpoint address="mex" binding="mexHttpBinding" contract="IMetadataExchange" />
  	</service>
    </services>
…


Host WCF service in IIS:

Run inetmgr command from Start -> Run to open IIS.
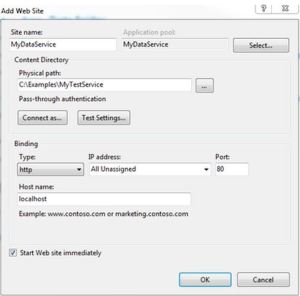
Right click on Sites and select Add Website. Enter Site name.

Service

Note: When you add a new Website, by default it creates a new application pool. You may assign it to an existing pool. The newly created pool may be configured with .Net V2.0. So go to Application Pools in IIS and double-click on newly created application pool. If it is pointing to older .Net versions then select appropriate framework version (in our case, the web application is created with .net V4.0 in first step).
Now try to access the service and we should be able to access service metadata. The URL should be similar to following:
http://localhost/Service1.svc

We can use WCF Test Client tool to test your service.